Follow Me On Social Media!
Easy Cherry Cheesecake with Pistachio Crust
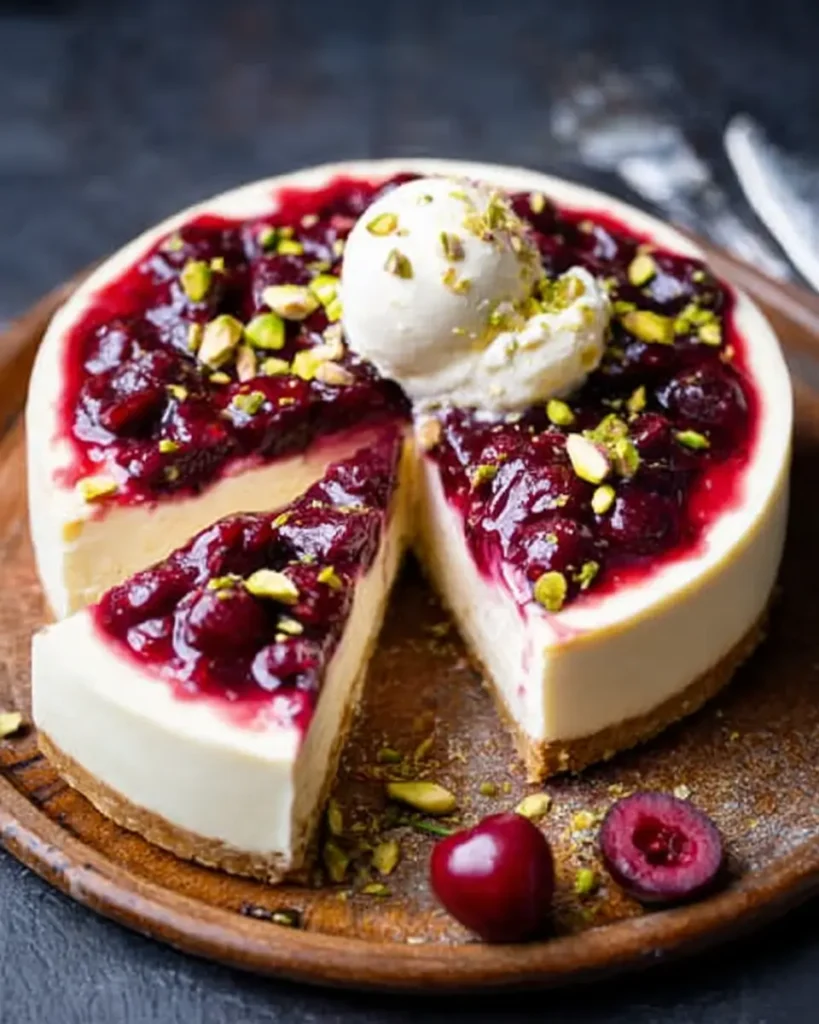
This Easy Cherry Cheesecake with Pistachio Crust combines a nutty, buttery base with a rich, creamy filling and a bright cherry topping. The recipe relies on classic cheesecake techniques—gentle mixing, controlled baking, and slow cooling—to achieve a smooth texture without cracks. The final result is an elegant yet approachable dessert with balanced sweetness and contrasting textures.
Why You’ll Love This Recipe
- Unique Pistachio Crust – A naturally gluten-free, nut-based crust adds depth and color beyond traditional graham crackers.
- Ultra-Creamy Texture – Cream cheese, sour cream, and careful mixing create a smooth, luxurious filling.
- No Water Bath Required – Simple oven techniques prevent cracks without extra equipment.
- Make-Ahead Friendly – Ideal for entertaining since it improves with overnight chilling.
- Balanced Sweetness – Tart cherries cut through the richness of the cheesecake.
- Visually Impressive – Vibrant green crust and glossy cherry topping make a stunning presentation.
Ingredients You’ll Need
For the Pistachio Crust
- 1 1/2 cups pistachio nuts, shelled and unsalted – Forms the base with natural oils and nutty flavor.
- 1/4 cup granulated sugar – Adds sweetness and helps bind the crust.
- 1/4 cup unsalted butter, melted – Provides richness and structure when baked.
For the Cheesecake Filling
- 16 oz cream cheese, softened – The primary structure and creamy body of the cheesecake.
- 1 cup granulated sugar – Sweetens and smooths the filling.
- 1 teaspoon vanilla extract – Enhances flavor and aroma.
- 3 large eggs – Binds the filling and provides structure when baked.
- 1 cup sour cream (or Greek yogurt) – Adds tang, moisture, and a silky texture.
For the Cherry Topping
- 1 can (21 oz) cherry pie filling – Provides sweetness, acidity, and visual appeal.
- Fresh cherries (optional) – Garnish for freshness and presentation.
Step-by-Step Instructions
- Prepare the Pistachio Crumbs
Preheat the oven to 350°F (175°C). Pulse pistachios in a food processor until finely ground but still crumbly. - Mix and Form the Crust
Combine ground pistachios, sugar, and melted butter, then press firmly into the bottom of a 9-inch springform pan. - Bake the Crust
Bake for 10 minutes to set the crust, then let it cool slightly while preparing the filling. - Cream the Filling Base
Beat cream cheese and sugar until smooth, scraping the bowl to avoid lumps. - Incorporate Eggs and Dairy
Add vanilla, then eggs one at a time on low speed, mixing just until combined. Fold in sour cream gently. - Assemble and Bake
Pour filling over the cooled crust and bake for 50–60 minutes until edges are set and the center slightly jiggles. - Cool Gradually
Turn off the oven and cool the cheesecake inside with the door ajar for 1 hour to prevent cracking. - Chill Thoroughly
Refrigerate for at least 4 hours, preferably overnight, to fully set. - Top and Serve
Spread cherry filling evenly over the cheesecake, garnish if desired, slice, and serve.
Recipe Notes & Tips
- Avoid Overmixing – Excess air can cause cracks and uneven texture.
- Room-Temperature Ingredients – Ensures smooth blending and prevents lumps.
- Springform Pan Seal – Line the base with parchment for easier removal.
- Center Jiggle Test – A slight wobble indicates a perfectly baked cheesecake.
- Overbaking Risk – Cheesecake continues to firm as it cools.
- Clean Slices – Wipe the knife between cuts for neat presentation.
Nutritional Information
- Prep Time: 15 minutes
- Cooking Time: 50 minutes
- Total Time: 1 hour 5 minutes (plus chilling)
- Servings: 10–12 slices
- Calories: Approximately 380–420 calories per slice (estimated)
Perfect Pairings
- Fresh Berries – Complements the cherry topping with added freshness.
- Coffee or Espresso – Balances the dessert’s richness.
- Dessert Wine – Pairs well with late-harvest or cherry-forward wines.
- Whipped Cream – Lightens each bite when served on the side.
Ideal Occasions
- Dinner Parties – Elegant yet approachable dessert option.
- Holiday Tables – Festive colors suit special occasions.
- Celebrations – Birthdays, anniversaries, and gatherings.
- Make-Ahead Events – Perfect when you need dessert ready in advance.
Storage & Serving Tips
- Refrigeration – Store covered for up to 4–5 days.
- Freezing – Freeze without topping for up to 2 months; thaw overnight.
- Serve Chilled – Best texture and flavor when cold.
- Add Topping Last-Minute – Keeps the surface glossy and fresh.
Creative Variations to Try
- Chocolate Cherry Cheesecake – Add cocoa powder to the filling.
- Lemon Pistachio Cheesecake – Add lemon zest for brightness.
- Honey-Sweetened Version – Replace sugar with honey in the filling.
- Homemade Cherry Compote – Reduce fresh cherries with sugar and lemon juice.
Troubleshooting Common Issues
- Cracked Surface – Cool more slowly and avoid overbaking.
- Grainy Texture – Overmixed eggs; mix on low speed only.
- Soggy Crust – Ensure crust is fully baked before filling.
- Loose Center – Chill longer; cheesecake firms as it sets.
Why This Recipe Works
This cheesecake succeeds because it balances fat, moisture, and gentle heat. The pistachio crust provides structure and flavor without flour, while sour cream softens the filling and adds acidity. Gradual cooling prevents temperature shock, reducing cracks. At around 400 calories per slice, it’s indulgent yet satisfying due to its rich texture and balanced sweetness.
Final Thoughts
Easy Cherry Cheesecake with Pistachio Crust is a refined dessert that blends classic technique with a unique flavor twist. It’s reliable, visually striking, and ideal for both casual and special occasions. For a lighter option, use Greek yogurt and reduce sugar slightly while keeping the same creamy consistency.