Follow Me On Social Media!
Butter Tarts: A Classic Canadian Treat.
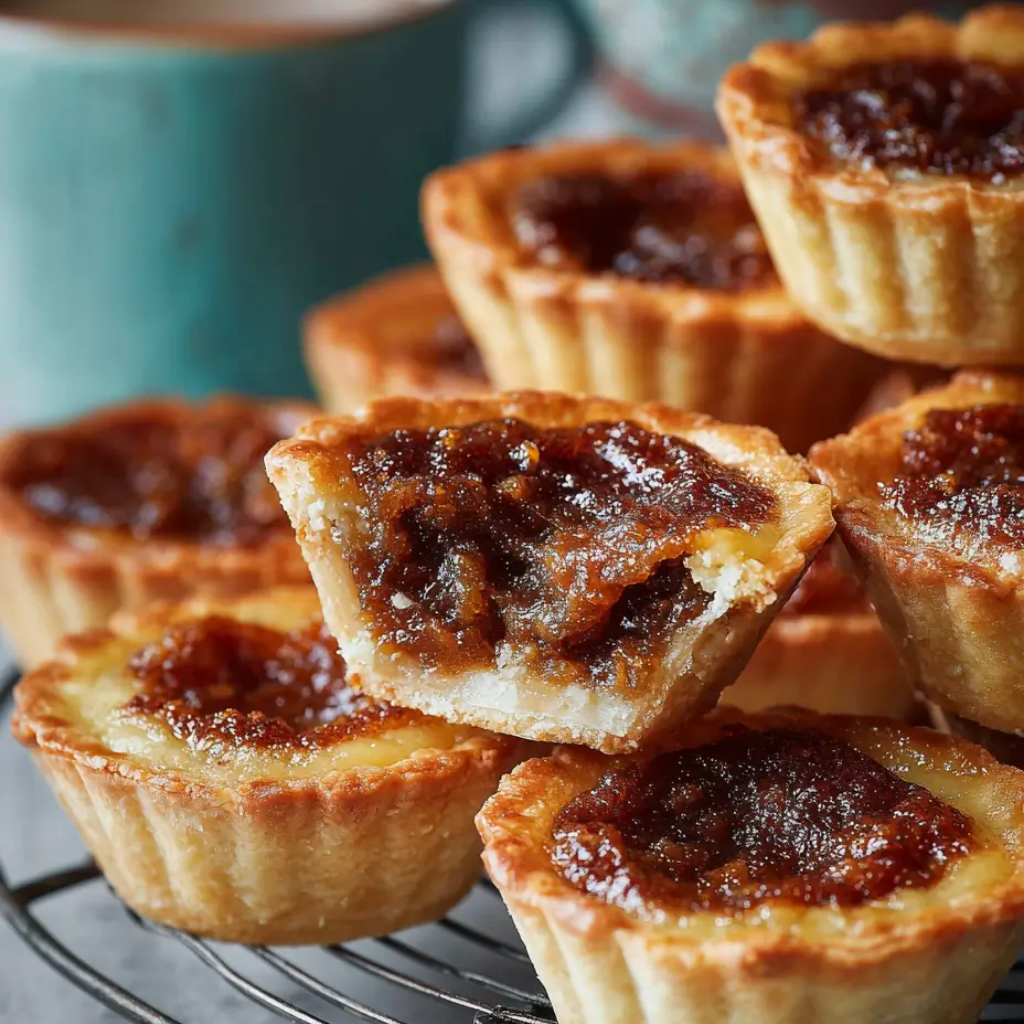
If there is a single dessert that defines the Canadian kitchen, it is the butter tart. This humble pastry is a source of national pride and spirited debate—specifically regarding the inclusion of raisins or walnuts. Rooted in the early 20th century, butter tarts are essentially a localized version of the “sugar pie” or “border tart,” featuring a flaky, lard-based crust and a gooey, caramelized center that sits somewhere between a custard and a syrup.
I appreciate the butter tart for its lack of pretension. It isn’t a delicate French tartlet; it is a robust, rustic sweet designed to be eaten with your hands. The goal is a crust so short it shatters upon impact and a filling that is just on the verge of running. This recipe is an honest tribute to that tradition, providing a balanced sweetness with that essential, slightly charred maple-and-butter aroma.
Ingredients
The Flaky Pastry
- 2 Cups All-Purpose Flour.
- 1/4 Teaspoon Sea Salt.
- 1/2 Cup Cold Unsalted Butter: Cubed.
- 1/2 Cup Cold Lard: This is the secret to a traditional, shatteringly flaky Canadian crust.
- 1/4 Cup Ice Water.
- 1 Teaspoon White Vinegar.
The Gooey Filling
- 1/2 Cup Brown Sugar: Packed.
- 1/2 Cup Pure Maple Syrup: Or corn syrup for a more traditional, neutral sweetness.
- 1/4 Cup Unsalted Butter: Melted and slightly cooled.
- 1 Large Egg: Room temperature.
- 1 Teaspoon Pure Vanilla Extract.
- 1/4 Teaspoon Sea Salt.
- 1/2 Cup Raisins or Chopped Walnuts: Optional (and highly debated).
Instructions
1. Master the Pastry
In a large bowl, whisk the flour and salt. Add the cold butter and lard. Use a pastry cutter or your fingertips to work the fats into the flour until the mixture resembles coarse crumbs with some pea-sized bits remaining. In a small cup, mix the ice water and vinegar. Drizzle it over the flour and toss with a fork until the dough just starts to come together. Form it into a disc, wrap in plastic, and chill for at least 1 hour.
2. Prepare the Filling
In a medium bowl, whisk together the brown sugar, maple syrup, melted butter, egg, vanilla, and salt. Whisk until the sugar has mostly dissolved and the mixture is smooth. If you are using raisins or walnuts, have them ready to drop into the shells individually.
3. Roll and Cut
On a lightly floured surface, roll out the chilled dough to about 1/8-inch thickness. Use a 4-inch round cutter to cut circles. Gently press the circles into a standard muffin tin. If the dough gets too warm, place the tin in the fridge for 10 minutes before filling.
4. Fill the Shells
Distribute your raisins or walnuts (if using) into the bottom of the pastry shells. Pour the liquid filling over the top, filling each shell only 2/3 of the way. If you overfill, the sugar will bubble over and stick the tart to the pan.
5. The Bake
Bake at 190°C (375°F) for 15 to 18 minutes. You are looking for the pastry to be golden brown and the filling to be bubbling vigorously. The center should still have a slight jiggle.
6. The Cooling Window
Let the tarts sit in the tin for exactly 5 minutes. While they are still warm, run a thin knife around the edges to ensure they aren’t stuck. Transfer to a wire rack to cool completely. This is the hardest part, as the filling needs time to set.
Flavor & Texture Notes
The primary sensation of a butter tart is caramelized decadence. The crust is salty and crisp, providing a necessary structural counterpoint to the viscous, buttery interior.
The flavor is a deep mix of toasted sugar and vanilla, with a hint of maple if you used it. Texture-wise, the edges of the filling should be slightly chewy and “candy-like,” while the center remains soft and molten. It is a rich, intensely sweet experience that is best balanced with a cup of strong black coffee.
Tips & Variations
- The Runny Factor: If you prefer a very runny tart, decrease the egg to just the yolk. If you prefer a firmer, more stable tart, bake for an extra 2 minutes.
- Vinegar Secret: The vinegar in the pastry prevents gluten development, ensuring the crust remains tender rather than tough.
- Brown Butter: For a more modern twist, brown the butter for the filling before mixing to add a nutty, toasted aroma.
Storage & Make-Ahead
- Room Temperature: These will stay fresh in an airtight container for up to 3 days.
- Refrigeration: You can store them in the fridge for up to a week; the filling will firm up significantly.
- Freezing: Butter tarts freeze beautifully. Place them in a single layer in a freezer bag for up to 2 months. Thaw at room temperature for an hour before serving.
FAQ
Why did my tarts leak?
Leaking usually happens if the filling was over-whisked (incorporating too much air, causing it to rise and spill) or if the shells were overfilled. Keep your whisking gentle and stick to the 2/3 rule.
Can I use all butter for the crust?
Yes, but the texture will be different. Lard provides a distinct “short” texture and flakiness that butter alone cannot replicate. If you use all butter, ensure it is extremely cold.
Should I soak my raisins?
If your raisins are very dry, soaking them in warm water (or rum) for 10 minutes before adding them to the tarts will prevent them from absorbing moisture from the filling.
Conclusion
The Canadian butter tart is a masterpiece of pantry-staple baking. It doesn’t require exotic fruits or complex decorations; it simply asks for good butter, real sugar, and a bit of patience with the pastry. This recipe provides a foolproof path to that perfect, gooey center and golden crust that has made this tart a legend for over a century.