Follow Me On Social Media!
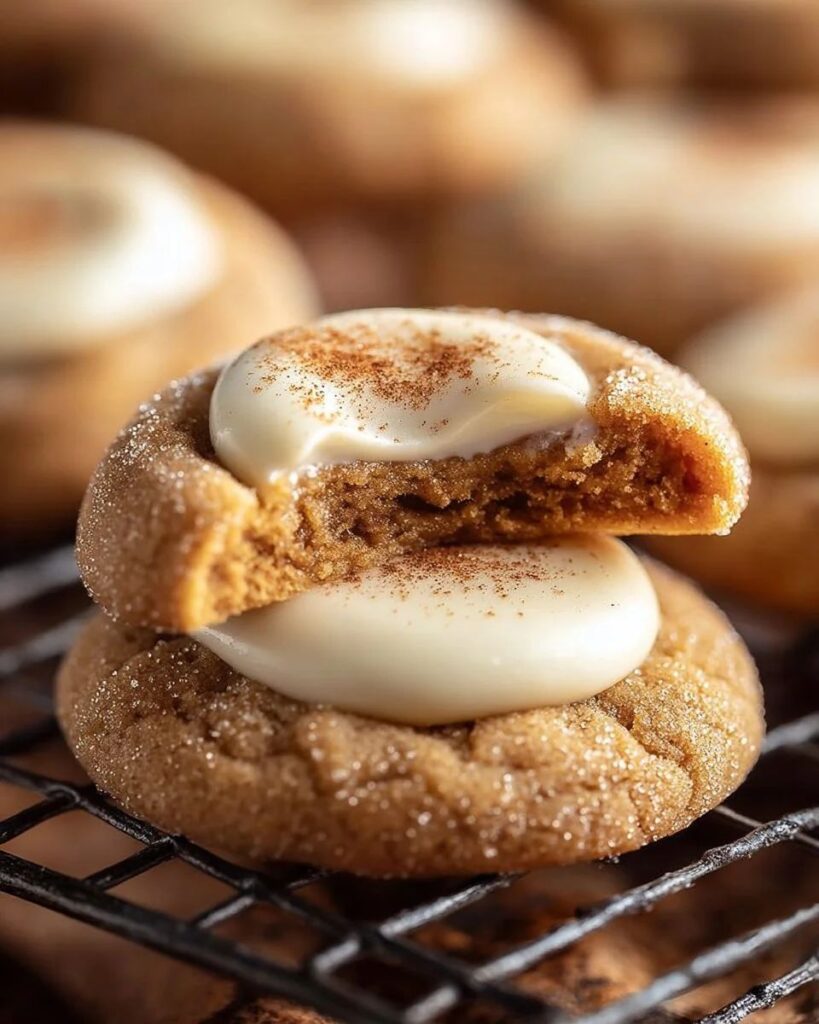
Soft Eggnog Snickerdoodle Thumbprint Cookies with Spiced Nutmeg Filling.
When the temperature drops and the first frost clings to the windowpane, my kitchen inevitably begins to smell like a blend of toasted cinnamon and freshly grated nutmeg. There is a specific kind of comfort found in holiday baking that goes beyond just eating a sweet treat. It is about the process—the rhythmic creaming of butter and sugar, the messy joy of rolling dough in cinnamon, and the anticipation of that first tray sliding out of the oven.
These Eggnog Snickerdoodle Thumbprint Cookies are a staple in my winter rotation because they bridge the gap between two classic favorites. On one hand, you have the iconic snickerdoodle: a soft, pillowy cookie with a signature tang and a crackled, sugar-dusted exterior. On the other, you have the rich, custard-like essence of eggnog. By turning these into thumbprint cookies, we create a little well that holds a concentrated burst of eggnog-spiced cream, making every bite a balance of textures.
Whether you are a seasoned baker looking for a new addition to your cookie swap or a beginner wanting something that looks impressive but remains straightforward to assemble, these cookies hit the mark. They aren’t overly sweet, allowing the warmth of the spices to take center stage, and they stay soft for days, which is a rare feat in the world of homemade cookies.
Ingredients for the Perfect Batch
To get the best results, ensure your refrigerated items are at room temperature before you begin. This allows the fats and liquids to emulsify properly, resulting in a more uniform crumb and a better rise.
The Snickerdoodle Base
- 1 cup (225g) unsalted butter, softened to room temperature
- 1 ½ cups (300g) granulated sugar
- 2 large eggs, room temperature
- 1 teaspoon vanilla extract (or vanilla bean paste for extra depth)
- 2 ¾ cups (345g) all-purpose flour
- 2 teaspoons cream of tartar (essential for that classic snickerdoodle tang)
- 1 teaspoon baking soda
- ½ teaspoon fine sea salt
The Rolling Sugar
- ¼ cup granulated sugar
- 2 teaspoons ground cinnamon
The Eggnog Spiced Filling
- ½ cup (115g) unsalted butter, softened
- 2 cups (240g) powdered sugar, sifted
- 3 tablespoons high-quality eggnog (store-bought or homemade)
- ½ teaspoon freshly grated nutmeg (fresh is significantly better than pre-ground here)
- A pinch of salt
Step-by-Step Instructions
Prepare the Oven and Baking Sheets
Start by preheating your oven to 350°F (175°C). Line two large baking sheets with parchment paper or silicone baking mats. This prevents sticking and ensures the bottoms of your cookies brown evenly without becoming too hard.
Cream the Butter and Sugar
In a large mixing bowl or the bowl of a stand mixer fitted with the paddle attachment, beat the softened butter and 1 ½ cups of granulated sugar together. You want to beat them on medium-high speed for about 2 to 3 minutes. The mixture should change from a dense yellow to a pale, fluffy consistency. This aeration is what gives the cookies their lightness.
Incorporate Wet Ingredients
Add the eggs one at a time, beating well after each addition. Scrape down the sides of the bowl to ensure everything is incorporated. Mix in the vanilla extract. If you want a slightly boozy undertone, you can add a half-teaspoon of rum extract here as well.
Mix the Dry Ingredients
In a separate medium bowl, whisk together the all-purpose flour, cream of tartar, baking soda, and sea salt. The cream of tartar is the “secret” ingredient in snickerdoodles—it provides a subtle acidity that reacts with the baking soda to create a soft, chewy texture and that characteristic flavor profile.
Combine and Chill
Turn your mixer to low speed and gradually add the flour mixture to the wet ingredients. Mix just until the white streaks of flour disappear. Over-mixing at this stage leads to a tough cookie, so stay vigilant. If your kitchen is particularly warm, I recommend chilling the dough for 30 minutes. This makes it easier to handle and prevents the cookies from spreading too much in the oven.
Roll and Coat
In a small bowl, stir together the ¼ cup of sugar and the cinnamon. Scoop about 1 tablespoon of dough at a time and roll it into a smooth ball (about 1 inch in diameter). Roll the ball in the cinnamon-sugar mixture until it is completely coated.
Create the Thumbprints
Place the balls on the prepared baking sheets, spaced about 2 inches apart. Using your thumb or the back of a rounded measuring spoon, gently press an indentation into the center of each ball. If the edges crack slightly, you can gently pinch them back together with your fingers.
Bake to Perfection
Bake for 9 to 11 minutes. The cookies should look set on the edges but still appear slightly soft in the center. Do not wait for them to turn dark brown; they will continue to firm up as they cool on the hot pan.
Reinforce the Wells
Immediately after removing the cookies from the oven, use the back of your measuring spoon to gently press down on the centers again. As the cookies rise during baking, the “thumbprint” often fills in slightly, so this step ensures you have enough room for the eggnog filling. Let the cookies cool completely on a wire rack before filling.
Make the Eggnog Filling
While the cookies cool, prepare the filling. Beat the softened butter until smooth, then gradually add the powdered sugar, eggnog, nutmeg, and salt. Whip on high speed until the frosting is light and airy.
Assemble
Once the cookies are cold to the touch, spoon or pipe the eggnog filling into the center of each cookie. A small piping bag or even a plastic bag with the corner snipped off makes this process much cleaner. Finish with a tiny dusting of extra nutmeg on top for a professional look.
Flavor and Texture Notes
These cookies offer a multi-layered sensory experience. The first thing you notice is the exterior—the cinnamon-sugar coating provides a slight crunch that gives way to a very soft, almost cake-like interior. Because of the cream of tartar, the cookie has a bright, clean finish that prevents it from feeling heavy.
The filling is where the eggnog really shines. It is creamy and rich, with the unmistakable warmth of nutmeg. Unlike a standard buttercream, the addition of actual eggnog gives it a custard-like flavor profile. When you bite into the cookie, the spice of the snickerdoodle base meets the cool, creamy center, creating a flavor that feels like a holiday celebration in a single bite.
Tips and Variations
- The Nutmeg Factor: If possible, buy whole nutmeg seeds and a microplane. Pre-ground nutmeg loses its volatile oils quickly and can taste “dusty.” Freshly grated nutmeg has a woody, citrusy, and spicy aroma that defines the eggnog experience.
- The Boozy Twist: For an adult version of these cookies, replace one tablespoon of the eggnog in the filling with a dark spiced rum or bourbon.
- Gluten-Free Option: You can swap the all-purpose flour for a high-quality 1:1 gluten-free baking flour blend. Just ensure the blend contains xanthan gum to help with the structure.
- Size Matters: If you prefer smaller, “two-bite” cookies, roll the dough into ¾ inch balls. Just keep an eye on the oven, as they will likely bake in 7 to 8 minutes.
Storage and Make-Ahead Guidance
Because the filling contains dairy, these cookies are best stored in an airtight container in the refrigerator if you aren’t serving them within a few hours. They will stay fresh for up to 4 days. Before serving, I suggest letting them sit at room temperature for about 15 minutes so the butter in the filling can soften slightly.
If you want to get ahead of your holiday baking, you can freeze the un-filled cookies for up to two months. Simply bake them, let them cool, and store them in a freezer-safe bag. When you are ready to serve, thaw them at room temperature and whip up a fresh batch of the eggnog filling.
Serving Suggestions
These cookies are naturally the star of a dessert platter, but they also pair beautifully with specific beverages. A hot cup of black tea or a dark roast coffee provides a bitter contrast that cuts through the richness of the eggnog.
If you want to lean into the theme, serve them alongside a small glass of actual eggnog or a spiced chai latte. For a more balanced snack spread, I often serve these after a light meal—perhaps a crisp winter salad with thinly sliced apples, toasted walnuts, and a sharp vinaigrette—to provide a sweet, spiced finish to the day.
FAQ
Why did my cookies spread too much?
This usually happens if the butter was too melted rather than just softened, or if the dough was too warm. If you find your first tray spreading, chill the remaining dough for 20 to 30 minutes before baking the rest.
Can I use eggnog in the cookie dough itself?
I don’t recommend adding liquid eggnog to this specific dough recipe, as it will change the moisture content and cause the cookies to become thin and oily. The best way to get that flavor is through the filling and the use of nutmeg in the dough.
My thumbprints cracked when I pressed them. What did I do wrong?
A few small cracks are normal! It usually means the dough is a bit cool or the flour was measured a bit heavily. You can smooth them out with your finger, or simply embrace the rustic look—the filling will cover most of the center anyway.
Do I have to use cream of tartar?
While you can technically replace it with more baking powder, you will lose the classic “snickerdoodle” flavor. The cream of tartar provides the specific texture and slight tang that separates a snickerdoodle from a plain sugar cookie.
Conclusion
There is something deeply satisfying about mastering a recipe that feels both nostalgic and fresh. These Eggnog Snickerdoodle Thumbprint Cookies bring together the best of winter spices and creamy textures, making them a standout choice for any gathering. They invite you to slow down, enjoy the process of baking, and share something handmade with the people you care about.