Follow Me On Social Media!
Red Velvet Crinkle Cookies: A Festive Delight.
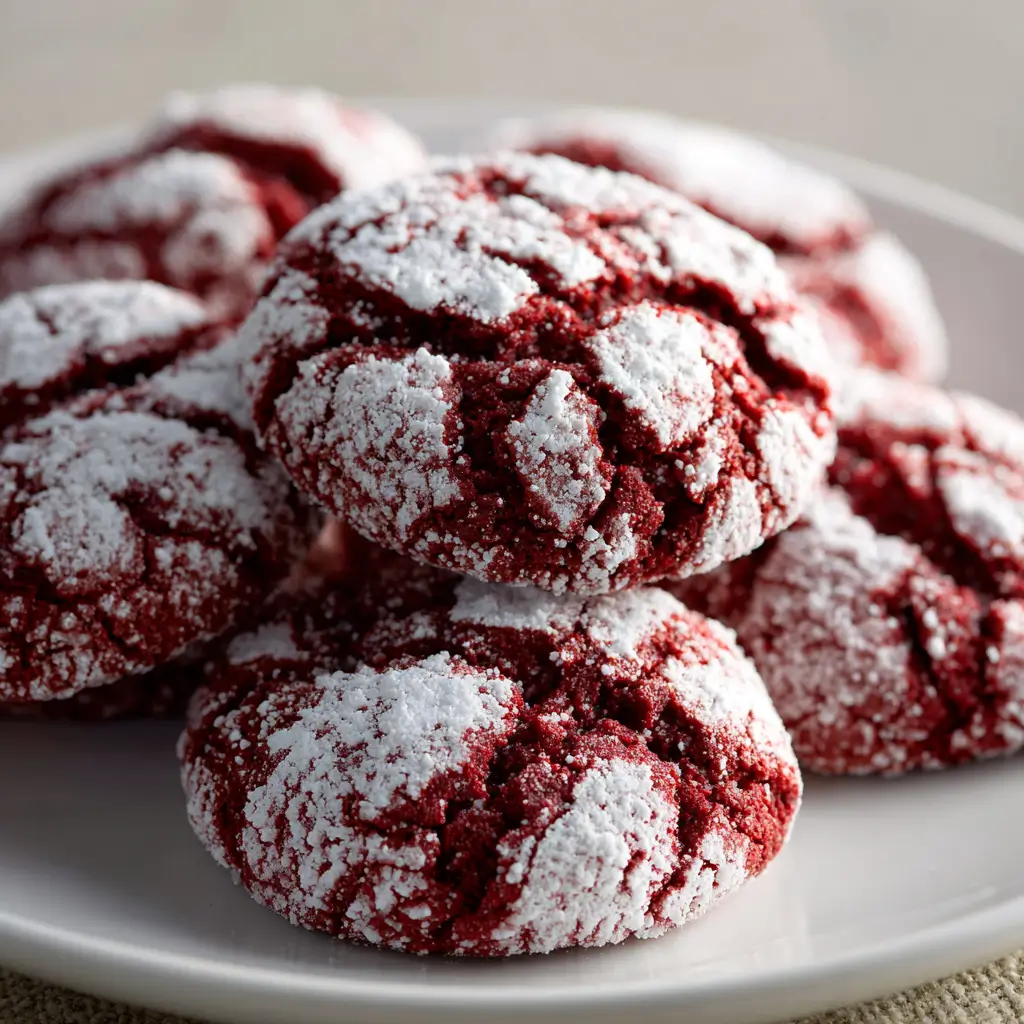
Red velvet crinkle cookies are a striking addition to any holiday platter or dessert spread. These cookies are characterized by their brilliant crimson interior and a stark, snowy-white “cracked” exterior. While they look like they belong in a professional bakery window, the secret to their success lies in a double-coating technique that prevents the powdered sugar from dissolving into the dough during the bake.
Texturally, these are a cross between a soft-baked cookie and a fudgy brownie, featuring the classic red velvet profile: a subtle hint of cocoa balanced by a light, buttery tang.
Ingredients
To achieve the deepest red color, a concentrated gel food coloring is recommended over liquid varieties.
- All-Purpose Flour: 250g.
- Unsweetened Cocoa Powder: 20g (don’t overdo the cocoa, or it will dull the red color).
- Baking Powder: 1.5 teaspoons.
- Salt: 1/4 teaspoon.
- Unsalted Butter: 115g (1 stick), softened.
- Granulated Sugar: 150g.
- Large Eggs: 2, room temperature.
- Vanilla Extract: 1 teaspoon.
- Red Gel Food Coloring: 1–2 teaspoons (depending on desired intensity).
- Granulated Sugar (for rolling): 50g.
- Powdered Sugar (for rolling): 100g.
Instructions
Step 1: The Dry Mix
In a medium bowl, whisk together the flour, cocoa powder, baking powder, and salt. Sifting the cocoa powder is highly recommended to avoid small bitter lumps in the cookies.
Step 2: Cream and Color
In a large bowl, cream the softened butter and the 150g of granulated sugar until light and fluffy (about 3 minutes). Beat in the eggs one at a time, followed by the vanilla and the red food coloring. The mixture should look very bright at this stage.
Step 3: Combine and Chill
Gradually add the dry ingredients to the wet ingredients, mixing on low speed just until combined. Crucially, cover the dough and refrigerate for at least 2 hours. If the dough is too warm, the cookies will spread too much, and the crinkle effect will be lost.
Step 4: The Double-Roll Technique
Preheat your oven to 175°C (350°F). Scoop about 1 tablespoon of chilled dough and roll it into a ball.
- First, roll the ball in the extra granulated sugar. This creates a moisture barrier.
- Second, roll the ball heavily in the powdered sugar until it is completely white.
Step 5: The Bake
Place the balls on a parchment-lined baking sheet, spaced 2 inches apart. Bake for 10 to 12 minutes. The cookies should puff up and “crack,” but they should still feel soft to the touch.
Step 6: Cool
Let the cookies rest on the baking sheet for 5 minutes to set before transferring them to a wire rack to cool completely.
Flavor and Texture Notes
These cookies offer a delicate crunch from the sugar coating that quickly gives way to a soft, pillow-like center. The flavor is mildly chocolatey, with a rich, buttery finish that is typical of red velvet. Because they are baked quickly at a moderate temperature, the centers remain moist and almost truffle-like.
Tips for Success
- The Sugar Barrier: Rolling the dough in granulated sugar before the powdered sugar is the professional secret. The granulated sugar absorbs the moisture from the dough so it doesn’t “eat” the powdered sugar, ensuring your crinkles stay white and crisp.
- Don’t Overbake: If you wait until these cookies feel firm in the oven, they will be dry. Pull them out when the cracks look set but the centers still look slightly underdone.
- Use Gel Color: Liquid food coloring can alter the hydration of the dough. Gel provides a more vibrant red without changing the texture.
FAQ
| Question | Answer |
| Why didn’t my cookies crinkle? | This usually happens if the dough was too warm or if the baking powder was expired. Ensure the dough is cold when it hits the oven. |
| Can I add chocolate chips? | Yes, 1/2 cup of white chocolate chips folded into the dough adds a beautiful flavor contrast. |
| How do I store these? | Keep them in an airtight container at room temperature for up to 4 days. |
Conclusion
Red Velvet Crinkle Cookies are a visually stunning treat that requires minimal decorating skill. The “crinkle” does all the work for you, creating a beautiful contrast that is perfect for gifting or festive gatherings. By following the chilling and double-rolling steps, you ensure a bakery-quality result every time.