- Time needed
- 14 hrs
- Made this
- 0 crocheters
- Skill level
- Easy
- Hook size
- 6 mm
- Finished size
- Approx. 24 in (61 cm) tall and 20 in (51 cm) wide
On this page
- Skill level
Easy
Simple stitches with a little shaping or colour change.
- Time
14 hrs
An average pace, including assembly.
- Use
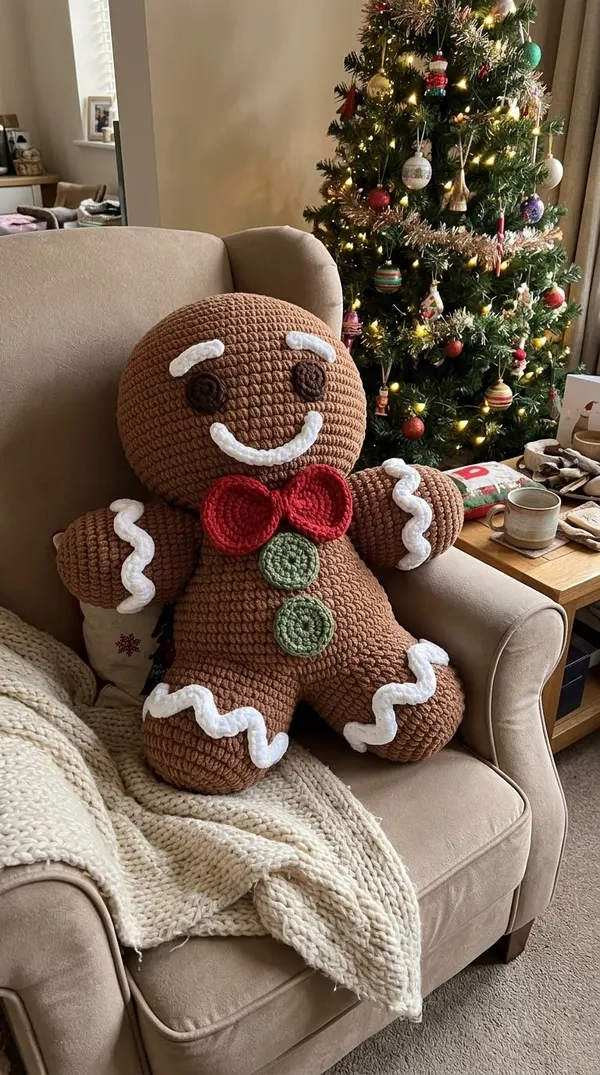
Holiday Cuddle Pillow
Approx. 24 in (61 cm) tall and 20 in (51 cm) wide
Why you'll love it
- Bulky yarn makes this giant plush work up surprisingly fast.
- The legs join into the body, so there's less sewing.
- Wavy icing trims give him a classic cookie look.
- He's soft and huggable for kids, and festive on the couch.
- Only basic stitches are used, so he's beginner friendly.
Materials needed
Tools
- 6.0 mm (US J-10) crochet hook
- Large tapestry needle
- Scissors
- Stitch markers
- Polyester fiberfill, approx. 2 lb (900 g)
- Sewing pins
Gauge & finished measurements
Gauge: 12 sc and 13 rounds = 4 in (10 cm) with a 6.0 mm hook. Head gauge: Rounds 1-15 measure about 9.5 in (24 cm) across when flat. Work tightly so the stuffing doesn't show.
Row counter
Row 0
Tap the circle after each row
The pattern
Head
Legs and Body
Arms
Face, Bow Tie and Buttons
Icing Trims
Assembly
- 1
Head: sew the head to the neck opening of the body, adding more stuffing to the neck before closing so the head doesn't wobble.
- 2
Arms: sew the flat tops of the arms to the sides of the body just below the neck, angled slightly upward.
- 3
Face: sew the eyes between Rounds 18 and 20 of the head, about 4 in (10 cm) apart. Sew the eyebrows in a curve above each eye. Sew the smile in a wide U shape about 2 rows below the eyes.
- 4
Bow tie and buttons: sew the bow tie at the top center of the body, just under the head. Sew the two buttons below it, about 1 in (2.5 cm) apart.
- 5
Icing: pin each arm icing in a zigzag around the arm about 1.5 in (4 cm) from the end. Pin each leg icing in a zigzag across the front and sides of the leg about 2 in (5 cm) from the foot. Sew in place.
- 6
Finish: weave in all ends and squeeze the plush to shape him evenly.
Important notes
- Tip: This is an original pattern inspired by the photo. Hidden details are interpreted from the image, and the pattern has not been physically test-crocheted.
- Tip: Abbreviations (US terms): ch = chain, sc = single crochet, hdc = half double crochet, sl st = slip stitch, MR = magic ring, dec = decrease.
- Tip: Work all round pieces in continuous rounds with a stitch marker. Flat pieces are worked in turned rows; the ch 1 does not count as a stitch.
- Tip: Dec (invisible single crochet decrease): insert hook in the front loop of the next 2 stitches, yarn over and pull through both loops, yarn over and pull through 2 loops.
- Tip: All features are crocheted and sewn on, so there are no small hard parts. Sew everything securely if he is for a young child.
Pattern FAQ
How much stuffing do I need?
About 2 lb (900 g) of polyester fiberfill. Stuff firmly in small handfuls so he holds his shape without lumps.
Can I use chenille or blanket yarn?
Yes. Super bulky chenille with an 8 mm hook makes a softer and even larger gingerbread man. Count stitches carefully, since chenille stitches are hard to see.
Is he safe for kids?
Yes. He has no buttons, beads, or safety eyes, but check that every part is sewn on securely.
How do I wash him?
Spot clean with a damp cloth. If needed, hand wash in cool water, squeeze out the water gently in a towel, and let him air dry completely.
Ratings & reviews
No reviews yet. Made it? Be the first to share how it went.
I made this!
Finished your Giant Gingerbread Man Pillow? Share a photo and it may be featured in our Made-by-You gallery.
Giant Gingerbread Man Crochet Pattern, © 2026 Southern Rambles. Source: https://southernrambles.com/patterns/giant-gingerbread-man-pillow-amigurumi-crochet-pattern/. Please do not redistribute this pattern.