Follow Me On Social Media!
Black Forest Cheesecake Bars: A Decadent Dessert.
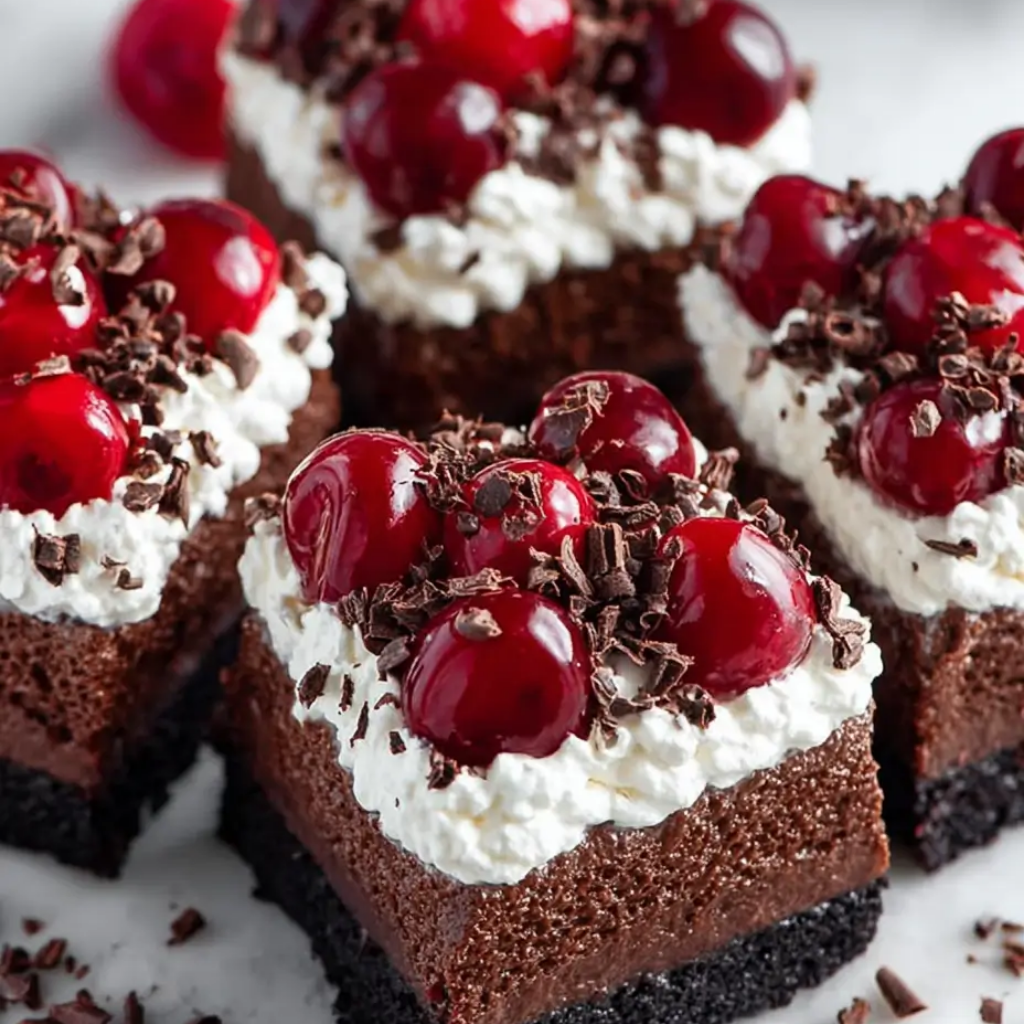
There is a timelessness to the combination of dark chocolate, tart cherries, and silky cream. Inspired by the classic German Schwarzwälder Kirschtorte, these Black Forest Cheesecake Bars take all the sophisticated elements of the traditional cake and translate them into a more approachable, shareable format. While a multi-layered cake can feel intimidating to bake and difficult to transport, these bars offer that same striking visual contrast and indulgent flavor profile with a fraction of the structural stress.
The magic of this dessert lies in the tension between its layers. You have the deep, slightly bitter crunch of a cocoa-infused crust, a dense and velvety vanilla bean cheesecake filling, and a vibrant, glossy cherry swirl that cuts right through the richness. I first began making these for holiday gatherings when I wanted a “showstopper” dessert that could be sliced neatly and eaten without a mountain of forks and plates. It’s a grown-up treat that manages to be both nostalgic and entirely refined.
Ingredients
The Chocolate Crust
- 1.5 Cups Chocolate Graham Cracker Crumbs: You can pulse whole crackers in a food processor until fine.
- 1/4 Cup Unsweetened Cocoa Powder: To deepen the chocolate flavor.
- 6 Tablespoons Unsalted Butter: Melted.
- 2 Tablespoons Granulated Sugar: To help the crust caramelize and hold together.
The Cheesecake Filling
- 16 oz Cream Cheese: Two standard blocks. Ensure they are softened to room temperature for a lump-free batter.
- 1/2 Cup Granulated Sugar: Just enough to sweeten without being cloying.
- 1/2 Cup Sour Cream: This provides the essential “tang” and creates a creamier mouthfeel.
- 2 Large Eggs: Also at room temperature.
- 1 Teaspoon Pure Vanilla Extract: Or vanilla bean paste for those beautiful black specks.
The Cherry Swirl
- 1 Cup Canned Tart Red Cherries: Drained.
- 2 Tablespoons Cherry Juice or Water
- 1 Tablespoon Cornstarch: To thicken the swirl.
- 1/4 Cup Semi-Sweet Chocolate Chips: For the final garnish.
Instructions
1. Build the Crust
Preheat your oven to 325°F (160°C). Line an 8×8 inch square baking pan with parchment paper, leaving an overhang on two sides to act as a “sling” for easy removal later. In a medium bowl, combine the chocolate cracker crumbs, cocoa powder, sugar, and melted butter. Stir until the mixture looks like wet sand. Press it firmly into the bottom of the pan in an even layer. Bake for 8 minutes, then remove and let it cool while you prep the filling.
2. Prepare the Cherry Sauce
In a small saucepan over medium heat, combine the cherries, cherry juice, and cornstarch. Stir constantly as it comes to a simmer. Use a spoon to gently mash some of the cherries to release their color. Once the sauce has thickened into a glossy jam-like consistency, remove it from the heat and let it cool slightly.
3. Mix the Cheesecake Batter
In a large bowl, beat the softened cream cheese and sugar together until completely smooth and fluffy. Add the sour cream and vanilla extract, mixing until incorporated. Add the eggs one at a time, beating on the lowest speed just until combined.
Tip: Over-mixing the eggs can incorporate too much air, which causes the cheesecake to puff up and then crack as it cools.
4. Layer and Swirl
Pour the cheesecake batter over the chocolate crust, smoothing it out with a spatula. Drop spoonfuls of the cherry sauce onto the top of the batter. Use a toothpick or a butter knife to gently swirl the cherry mixture into the cheesecake, creating a marbled effect. Be careful not to press too deep and disturb the crust.
5. Bake and Set
Bake for 35 to 40 minutes. The edges should be set and slightly puffed, but the center should still have a slight “jiggle” when you gently shake the pan. Turn off the oven, crack the door open slightly, and let the cheesecake sit inside for 10 minutes—this slow cooling prevents cracks.
6. The Long Chill
Remove the pan from the oven and let it reach room temperature. Once cool, cover and refrigerate for at least 4 hours, though overnight is best. This chill time is vital for the cheesecake to develop its dense, velvety texture.
Flavor and Texture Notes
These bars are an exercise in balance. The crust is dark and earthy, providing a firm, crunchy base that anchors the dessert. The cheesecake layer is incredibly smooth and cool, with a subtle tang from the sour cream that prevents it from feeling too heavy.
The cherry swirl is the highlight—it offers a bright, acidic “pop” that wakes up the palate. When you top the finished bars with a few shaved chocolate curls or mini chocolate chips, you get a final hit of sweetness. Every bite is a combination of creamy, tart, and crunchy, making it a dessert that feels balanced despite its decadence.
Tips and Variations
While these bars are wonderful as written, you can easily customize them:
- The Boozy Twist: For a truly traditional Black Forest experience, stir a tablespoon of Kirsch (cherry brandy) into the cherry sauce while it simmers.
- Different Crusts: If you can’t find chocolate graham crackers, use crushed Oreo cookies (creme removed) or even crushed chocolate wafer cookies.
- White Chocolate Version: Melt 1/2 cup of white chocolate and swirl it in alongside the cherries for an extra layer of sweetness.
- No-Bake Option: You can adapt this into a no-bake bar by using a standard no-bake cheesecake recipe and topping it with the cherry sauce once chilled.
Storage and Make-Ahead
Cheesecake is the ultimate make-ahead dessert because it actually improves with time.
- Refrigeration: Keep the bars in the fridge for up to 5 days. Ensure they are covered so they don’t absorb any other “fridge smells.”
- Freezing: These bars freeze beautifully. Slice them first, wrap individual bars in plastic wrap, and store them in a freezer bag for up to 2 months. Thaw in the fridge for an hour before eating.
- Slicing Tip: For those perfect, clean “bakery-style” edges, use a sharp knife dipped in hot water and wiped dry between every single cut.
Serving Suggestions
To lean into the decadence, serve each bar with a generous dollop of freshly whipped cream. You can also add a fresh cherry on top of each square for a professional finish.
Because the flavors are so rich, these bars pair exceptionally well with a bitter beverage. A strong cup of black coffee or a shot of espresso provides the perfect contrast to the sweet cream and tart fruit. For an evening treat, a glass of ruby port or a dark, chocolatey stout beer would be an adventurous and delicious pairing.
FAQ
Why did my cheesecake crack?
Cracks are usually caused by over-mixing the eggs or cooling the cheesecake too quickly. Always use room-temperature ingredients and let the bars cool gradually in the oven with the door cracked to avoid sudden temperature shifts.
Can I use cherry pie filling instead of making the sauce?
Yes, in a pinch, you can use canned cherry pie filling. However, pie filling is often much sweeter and has a thicker “gel” than homemade sauce, so the bars will be a bit more sugary.
Do I have to use sour cream?
If you don’t have sour cream, you can substitute it with plain Greek yogurt. It provides the same acidity and creaminess, though the texture might be slightly more dense.
How do I know when the bars are done?
Look for the “jiggle.” The outer two inches of the bars should look firm and matte, while the very center should still wobble slightly like Jell-O when the pan is moved. It will firm up completely as it chills.
Conclusion
Black Forest Cheesecake Bars are a reminder that some flavor combinations are classics for a reason. By deconstructing a complicated cake into a simple, layered bar, you get to focus on the quality of the ingredients and the joy of sharing a truly special treat. Whether you’re celebrating a milestone or just want to elevate a quiet weekend, these bars bring a touch of old-world elegance to your kitchen.