Follow Me On Social Media!
The Ultimate Guide to Cake Jars: A Modern Spin on Classic Layers.
Baking a full layer cake is often a labor of love, but let’s be honest—transporting it to a party or keeping it fresh for more than a day can be a logistical nightmare. This is exactly why the “Cake Jar” has taken the culinary world by storm. It isn’t just a trend for the sake of being trendy; it is a practical, clever way to serve dessert that ensures every single bite is as moist as the first.
By sealing cake and frosting inside a glass jar, you create a micro-environment that locks in moisture. No more dry edges or crumbling slices. Whether you are looking for a unique handmade gift or a way to meal-prep your sugar fix for the week, these jars offer a high-impact presentation with significantly less stress than a traditional tiered bake.
Ingredients
To make a batch of approximately six 250ml jars, you will need the following components. You can use your favorite recipes or high-quality store-bought versions to save time.
The Cake Base
- All-Purpose Flour: 250g.
- Granulated Sugar: 200g.
- Unsweetened Cocoa Powder: 40g (if making chocolate) or extra flour for vanilla.
- Baking Powder: 1.5 teaspoons.
- Eggs: 2 large, room temperature.
- Whole Milk: 120ml.
- Vegetable Oil: 120ml (oil keeps jar cakes softer when chilled than butter does).
- Boiling Water: 120ml (for chocolate cake) or additional milk for vanilla.
The Creamy Filling
- Unsalted Butter: 225g, softened.
- Powdered Sugar: 450g, sifted.
- Heavy Cream: 2 tablespoons.
- Vanilla Bean Paste: 1 tablespoon.
- Pinch of Salt: To balance the sweetness.
The Texture Layers
- Fruit: 150g fresh berries or fruit jam.
- Crunch: 100g crushed cookies, toasted nuts, or chocolate chips.
Instructions
Step 1: Bake and Cool
Prepare your cake according to your preferred recipe. For jars, a sheet pan bake is often most efficient. Once the cake is out of the oven, let it cool completely. Attempting to assemble jars with warm cake will create steam, which leads to a soggy mess and melted frosting.
Step 2: Create the Cake Discs
Once cooled, you have two choices: crumble the cake into small pieces or use a circular cookie cutter that matches the diameter of your jars to cut out neat discs. The disc method results in cleaner, more professional-looking layers, while crumbles are great for a rustic, “trifle” look.
Step 3: Prepare the Frosting
Whip your softened butter until it is pale and airy—this usually takes about 5 minutes. Gradually add the powdered sugar, cream, and vanilla. Continue whisking until the frosting is stiff enough to hold its shape but soft enough to be piped through a nozzle.
Step 4: The Bottom Layer
Place your first disc or a layer of crumbs at the bottom of the clean jars. Use a small spoon or a tamper to lightly press the cake down so it forms an even base.
Step 5: Piping and Filling
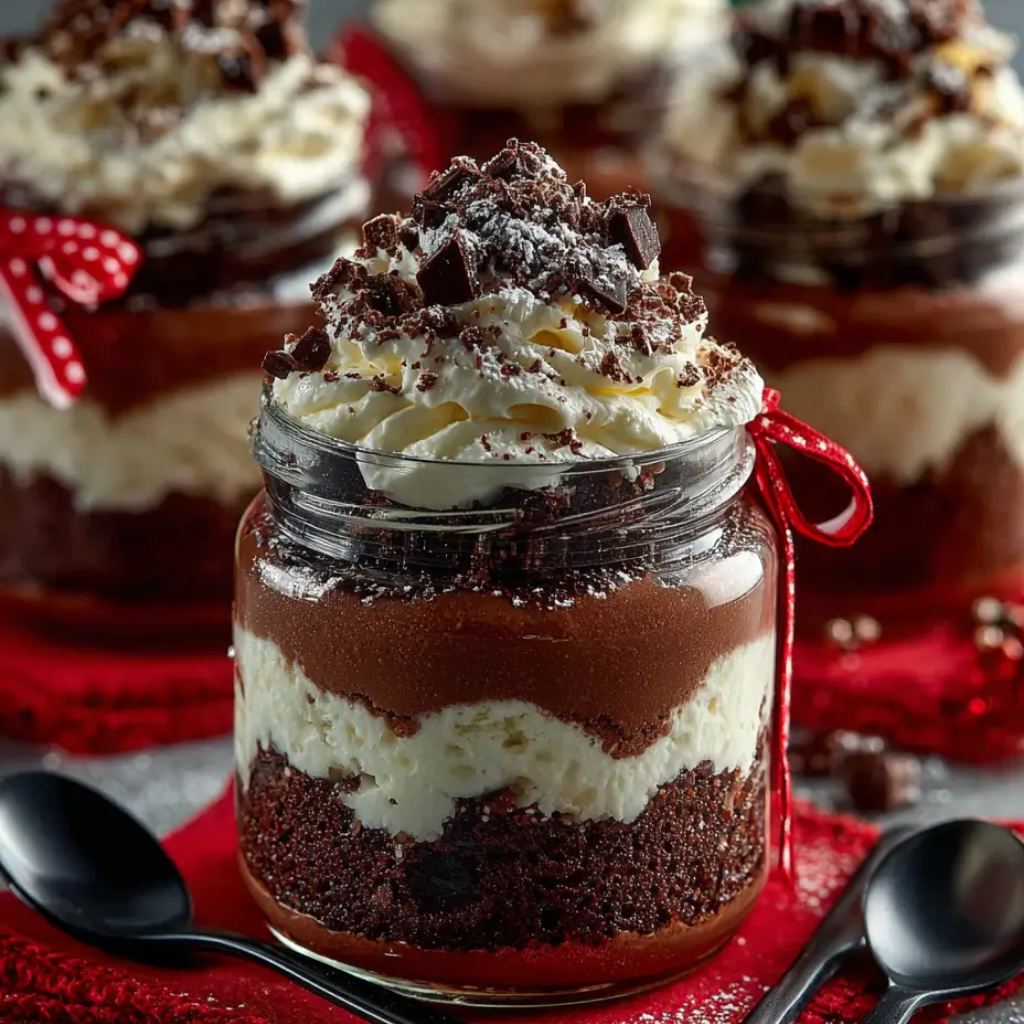
Transfer your frosting to a piping bag fitted with a large round or star tip. Pipe a steady spiral of frosting over the cake, starting from the glass and working toward the center. This ensures the “layer” look is visible from the outside. Add a spoonful of your fruit or crunch element on top of the frosting.
Step 6: Repeat and Seal
Add a second layer of cake and repeat the frosting process. Continue until you reach the top of the jar. Finish with a decorative swirl of frosting and a sprinkle of your texture element. Wipe the inner rim of the jar with a clean cloth before twisting the lid on tight.
Flavor and Texture Notes
A well-constructed cake jar is all about the contrast of sensations. The cake should feel pillowy and light, while the frosting provides a silky, buttery richness. By adding a “crunch” layer, you introduce a necessary break in the softness. If you use fresh fruit, you get a bright, acidic pop that cuts through the sugar, preventing the dessert from feeling one-dimensional or cloying.
Tips and Variations
The beauty of this format is its versatility. You can adapt the contents to suit any season or dietary requirement:
- The “Soak”: If you aren’t using a high-moisture oil cake, brush your cake layers with a simple syrup or a splash of coffee to guarantee a melt-in-the-mouth experience.
- Vegan Jars: Use a flax-egg based cake and a coconut cream-based frosting. Jars are excellent for vegan bakes as they help hide any structural fragilities of eggless cakes.
- Gluten-Free: Since the jar provides the structure, gluten-free cakes—which can sometimes be crumbly—work perfectly here because they don’t need to stand up on a plate.
- Holiday Themes: Use gingerbread cake and spiced cream cheese frosting for winter, or a light lemon sponge with elderflower syrup for spring.
Storage and Make-Ahead
Cake jars are the king of make-ahead desserts. They can be assembled up to 2 days in advance and stored in the refrigerator. In fact, many find they taste better on day two because the cake has time to absorb a little moisture from the frosting.
If you are using fresh fruit like strawberries, aim to eat them within 48 hours as the fruit will begin to release juices. For long-term storage, most cake jars (without fresh fruit) can be frozen for up to a month. Just ensure you leave a tiny bit of “headspace” at the top of the jar so the contents can expand slightly as they freeze.
Serving Suggestions
For a casual picnic, serve the jars exactly as they are with a long-handled spoon tied to the side with twine. For a more formal event, you can garnish the top of the frosting with edible flowers or a gold-leaf flake. If you want to take it a step further, serve the jar slightly chilled; the contrast between the cold cream and the soft cake is incredibly refreshing.
FAQ
Do I have to use Mason jars?
Not at all. You can use any glass jar with a wide mouth, including upcycled jam or honey jars. Just make sure they are thoroughly sterilized before use.
How do I prevent the frosting from being too sweet?
Add a generous pinch of fine sea salt to your buttercream. It won’t make it salty, but it will neutralize the “sugar sting” and allow the vanilla or chocolate flavors to shine.
Can I make these without a piping bag?
You can use a spoon to drop the frosting in, but it will be harder to get those clean, distinct layers against the glass. A simple plastic sandwich bag with the corner snipped off works as a great DIY piping bag.
Conclusion
Cake Jars take the best parts of a celebration cake and make them accessible for everyday enjoyment. They are fun to build, stunning to look at, and arguably the most foolproof way to serve a dessert that stays moist and delicious. Whether you’re gifting them to a friend or tucking one into your own lunchbox, they represent a small, perfect portion of joy that travels wherever you go.